如果文章中代码不便于阅读,请使用电脑查看或点击阅读原文。
Spring Security是针对Spring项目的安全框架,也是Spring Boot底层安全模块的默认技术选型,仅需引入spring-boot-starter-security模块,进行少量配置,即可实现强大的Web安全控制。
Spring Security的两个主要目标是认证和授权(访问控制)
官方文档:https://docs.spring.io/spring-security/site/docs/5.2.0.RELEASE/reference/htmlsingle/
0 开发环境
-
JDK:1.8
-
Spring Boot:2.7.18
Spring Boot 版本升级为2.7.18,专栏中其他Spring Boot相关环境同步升级
1 引入依赖
<dependency> <groupId>org.springframework.boot</groupId> <artifactId>spring-boot-starter-security</artifactId></dependency>
2 测试
2.1 新建Controller
@RestController@RequestMapping("user")public class UserController { @GetMapping(value = "query") public String query() { return "用户查询成功"; }}
2.2 测试
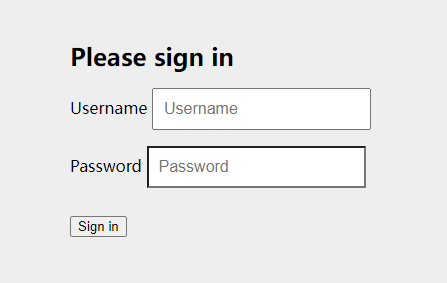
启动服务,浏览器访问 127.0.0.1:8090/user/query,页面自动跳转到授权登录页
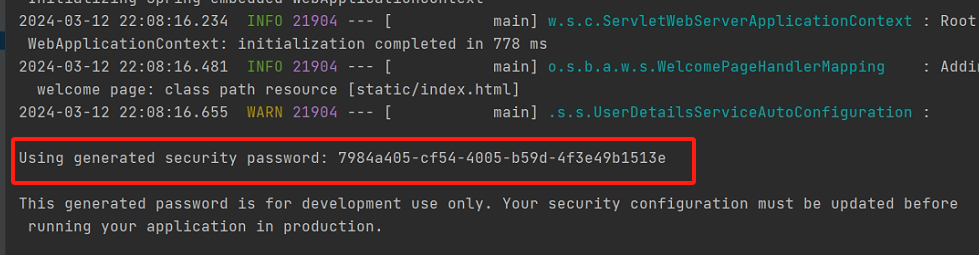
默认用户名为user,控制台上会打印默认密码,默认密码每次启动服务都会刷新
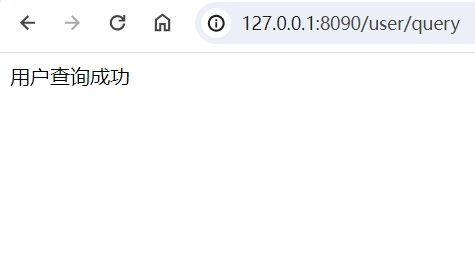
登录成功后,就可以正常访问了
3 自定义密码
该部分会使用到Spring Security的几个关键类,如下:
-
WebSecurityConfigurerAdapter 自定义Security策略
-
AuthenticationManagerBuilder 自定义认证策略
-
@EnableWebSecurity 开启WebSecurity模式
3.1 通过application.yml 配置
spring: security: user: name: admin password: 123456
3.2 自定义配置类配置
@EnableWebSecuritypublic class SecurityConfig extends WebSecurityConfigurerAdapter { @Override protected void configure(AuthenticationManagerBuilder auth) throws Exception { //密码加密 BCryptPasswordEncoder passwordEncoder = new BCryptPasswordEncoder(); //配置用户名、密码,该配置方式下,用户名和密码保存在内存中 auth.inMemoryAuthentication() //密码加密方式 .passwordEncoder(new BCryptPasswordEncoder()) .withUser("admin").password(passwordEncoder.encode("123456")).roles("admin"); }}
3.3 自定义实现类配置
3.3.1 编写UserDetailsService实现类
这里我们就直接固定写死用户名和密码,实际生产中可以从数据库中获取
@Servicepublic class UserDetailsServiceImpl implements UserDetailsService { @Override public UserDetails loadUserByUsername(String s) throws UsernameNotFoundException { //设置角色,角色的概念后续介绍 List<GrantedAuthority> roles = AuthorityUtils.commaSeparatedStringToAuthorityList("admin"); return new User("admin", new BCryptPasswordEncoder().encode("123456"), roles); }}
3.3.2 编写配置类
@EnableWebSecuritypublic class SecurityConfig extends WebSecurityConfigurerAdapter { @Autowired private UserDetailsServiceImpl userDetailsService; @Override protected void configure(AuthenticationManagerBuilder auth) throws Exception { //使用UserDetailsServiceImpl 查询用户名、密码 auth.userDetailsService(userDetailsService).passwordEncoder(new BCryptPasswordEncoder()); }}
分别测试,都通过
4 用户认证和授权/基于角色和权限的访问控制
实际生产中,需要根据用户角色的权限来控制可访问的页面、可执行的操作等
4.1 新建4个页面
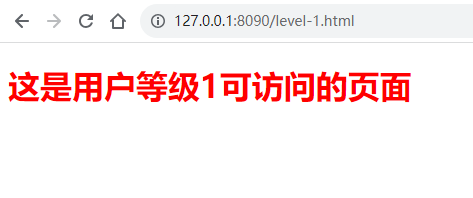
level-1.html
<!DOCTYPE html><html lang="en"><head> <meta charset="UTF-8"> <title>Title</title></head><body><h1 style="color: red">这是用户等级1可访问的页面</h1></body></html>
level-2.html
<!DOCTYPE html><html lang="en"><head> <meta charset="UTF-8"> <title>Title</title></head><body><h1 style="color: green">这是用户等级2可访问的页面</h1></body></html>
level-3.html
<!DOCTYPE html><html lang="en"><head> <meta charset="UTF-8"> <title>Title</title></head><body><h1 style="color: blue">这是用户等级3可访问的页面</h1></body></html>
index.html
<!DOCTYPE html><html lang="en"><head> <meta charset="UTF-8"> <title>Title</title></head><body><a href="level-1.html">等级1</a><br><br><a href="level-2.html">等级2</a><br><br><a href="level-3.html">等级3</a></body></html>
4.2 修改配置类
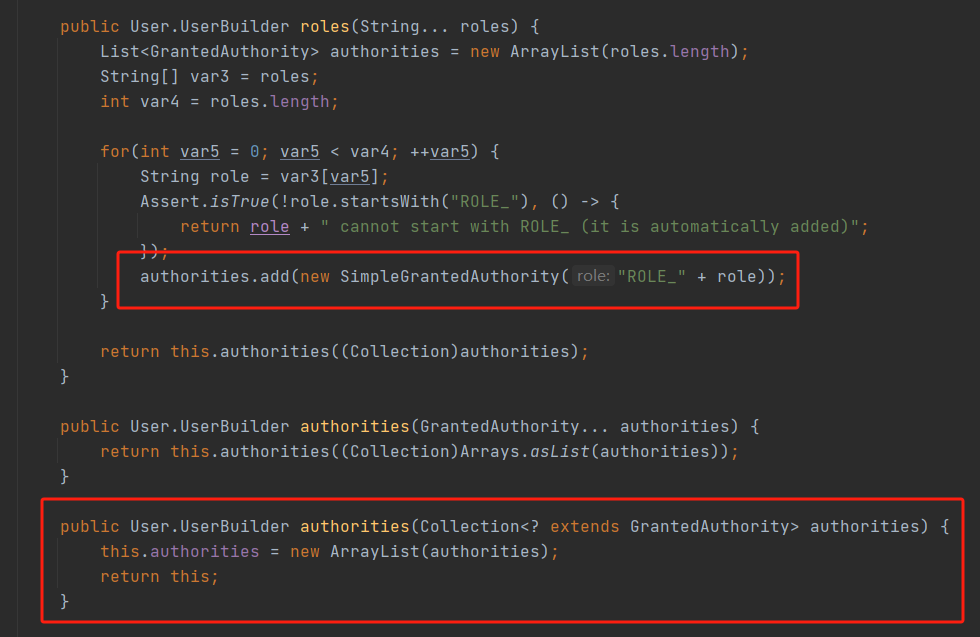
@EnableWebSecuritypublic class SecurityConfig extends WebSecurityConfigurerAdapter { @Override protected void configure(HttpSecurity http) throws Exception { //请求授权的规则 //开启认证 http.authorizeRequests() //首页所有人可访问 .antMatchers("/").permitAll() //功能页对应角色或权限才能访问 //hasRole 为角色授权,表示用户拥有指定角色 //hasAuthority 为权限授权,表示用户拥有指定权限 .antMatchers("/level-1.html").hasRole("level1") .antMatchers("/level-2.html").hasRole("level2") .antMatchers("/level-3.html").hasAuthority("level3"); //开启登录,无权限时进入登录页面 http.formLogin(); } @Override protected void configure(AuthenticationManagerBuilder auth) throws Exception { //密码加密 BCryptPasswordEncoder passwordEncoder = new BCryptPasswordEncoder(); //配置用户名、密码,该配置方式下,用户名和密码保存在内存中 auth.inMemoryAuthentication() //密码加密方式 .passwordEncoder(new BCryptPasswordEncoder()) .withUser("admin").password(passwordEncoder.encode("123456")).roles("admin") .and().withUser("admin1").password(passwordEncoder.encode("123456")).roles("level1") .and().withUser("admin2").password(passwordEncoder.encode("123456")).roles("level2") .and().withUser("admin3").password(passwordEncoder.encode("123456")).authorities("level3") .and().withUser("admin0").password(passwordEncoder.encode("123456")).authorities("ROLE_level1", "ROLE_level2", "level3"); }}
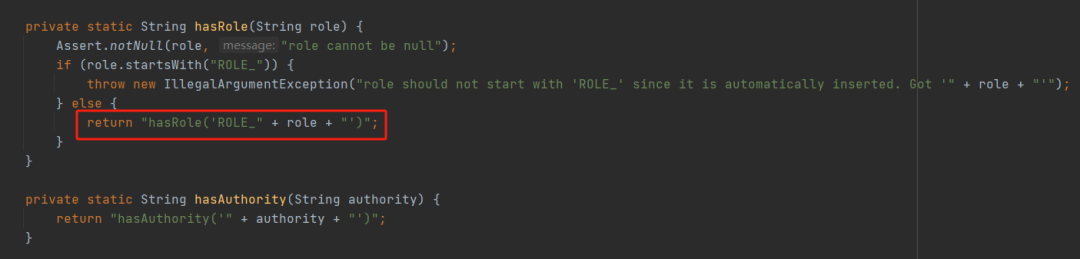
hasRole()和hasAuthority()用法是类似的,只不过hasRole()方法会给自定义的角色名前加上 ROLE_ 前缀
因此在自定义用户时,如果使用authorities()给用户设置角色时,需要自行添加上ROLE_前缀。
roles()和authorities()设置的角色或权限,最终都存放在authorities参数中,且这两个方法会互相覆盖彼此的值。
4.3 测试
浏览器访问
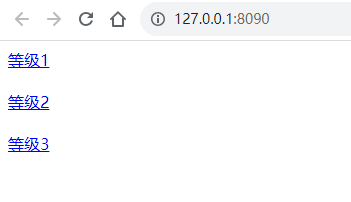
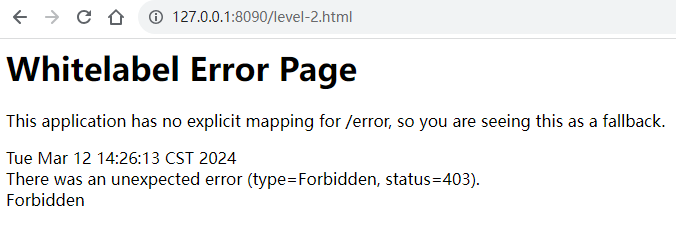
依次点击等级1、等级2、等级3,均自动跳转到授权登录页面,登录对应权限的用户后,可成功访问。
其中,登录admin用户,无法访问任何页面,登录admin0,可访问所有页面
登录权限不匹配的用户,拒绝访问
4.4 使用UserDetailsService类实现
UserDetailsServiceImpl
@Servicepublic class UserDetailsServiceImpl implements UserDetailsService { @Override public UserDetails loadUserByUsername(String s) throws UsernameNotFoundException { List<GrantedAuthority> roles; if ("admin1".equals(s)) { roles = AuthorityUtils.commaSeparatedStringToAuthorityList("ROLE_level1"); } else if ("admin2".equals(s)) { roles = AuthorityUtils.commaSeparatedStringToAuthorityList("ROLE_level2"); } else if ("admin3".equals(s)) { roles = AuthorityUtils.commaSeparatedStringToAuthorityList("level3"); } else if ("admin0".equals(s)) { roles = AuthorityUtils.createAuthorityList("ROLE_level1", "ROLE_level2", "level3"); } else { roles = AuthorityUtils.createAuthorityList("admin"); } return new User(s, new BCryptPasswordEncoder().encode("123456"), roles); }}
SecurityConfig
@EnableWebSecuritypublic class SecurityConfig extends WebSecurityConfigurerAdapter { @Autowired private UserDetailsServiceImpl userDetailsService; @Override protected void configure(HttpSecurity http) throws Exception { //请求授权的规则 //开启认证 http.authorizeRequests() //首页所有人可访问 .antMatchers("/").permitAll() //功能页对应角色或权限才能访问 //hasRole 为角色授权,表示用户拥有指定角色 //hasAuthority 为权限授权,表示用户拥有指定权限 .antMatchers("/level-1.html").hasRole("level1") .antMatchers("/level-2.html").hasRole("level2") .antMatchers("/level-3.html").hasAuthority("level3"); //开启登录,无权限时进入登录页面 http.formLogin(); } @Override protected void configure(AuthenticationManagerBuilder auth) throws Exception { //使用UserDetailsServiceImpl 查询用户名、密码 auth.userDetailsService(userDetailsService).passwordEncoder(new BCryptPasswordEncoder()); }}
浏览器访问,测试,通过
5 常用注解
可控制用户认证访问接口
5.1 @Secured()
校验用户具有某个角色,才可访问接口
需在启动类开启注解
@EnableGlobalMethodSecurity(securedEnabled = true)
然后在接口方法上配置注解
@RestController@RequestMapping("user")public class UserController { @GetMapping(value = "query") @Secured("ROLE_level1") public String query() { return "用户查询成功"; } @GetMapping(value = "update") @Secured({"ROLE_level1", "ROLE_level2"}) public String update() { return "用户更新成功"; }}
5.2 @PreAuthorize()
在进入方法前校验用户具有某个权限或角色
需在启动类开启注解
@EnableGlobalMethodSecurity(securedEnabled = true, prePostEnabled = true)
然后在接口方法上配置注解
@RestController@RequestMapping("user")public class UserController { @GetMapping(value = "delete") @PreAuthorize("hasAnyAuthority('ROLE_level1','level3')") public String delete() { return "用户删除成功"; }}
5.3 @PostAuthorize()
在进入方法后校验用户具有某个权限或角色
需在启动类开启注解
@EnableGlobalMethodSecurity(securedEnabled = true, prePostEnabled = true)
然后在接口方法上配置注解
@RestController@RequestMapping("user")public class UserController { @GetMapping(value = "delete") @PostAuthorize("hasAnyAuthority('ROLE_level1','level3')") public String delete() { return "用户删除成功"; }}
5.4 @PostFilter()
校验权限后对数据进行过滤,只返回满足条件的数据
新建实体类
@Data@AllArgsConstructor@NoArgsConstructorpublic class UserModel { private String username; private String password;}
然后在方法上加上注解
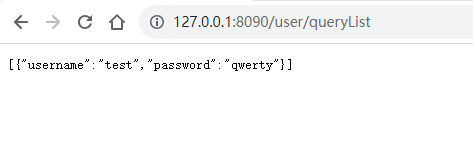
@RestController@RequestMapping("user")public class UserController { @GetMapping(value = "queryList") @PreAuthorize("hasAnyAuthority('ROLE_level1','level3')") @PostFilter("filterObject.username == 'test'") public List<UserModel> queryList() { List<UserModel> userList = new ArrayList<>(); userList.add(new UserModel("test", "qwerty")); userList.add(new UserModel("test2", "asdfgh")); userList.add(new UserModel("test3", "zxcvbn")); return userList; }}
测试,权限验证通过后
5.5 @PreFilter()
校验权限后对数据进行过滤,只有满足条件的数据才能传入接口方法中
@RestController@RequestMapping("user")public class UserController { @PostMapping(value = "queryUser") @PreAuthorize("hasAnyAuthority('ROLE_level1','level3')") @PreFilter("filterObject.username == 'test2'") public List<UserModel> queryUser(@RequestBody List<UserModel> userModels) { return userModels; }}
测试,权限验证通过后

6 记住我
配置类中开启记住我
@Override protected void configure(HttpSecurity http) throws Exception { //请求授权的规则 //开启认证 http.authorizeRequests() //首页所有人可访问 .antMatchers("/").permitAll() //功能页对应角色或权限才能访问 //hasRole 为角色授权,表示用户拥有指定角色 //hasAuthority 为权限授权,表示用户拥有指定权限 .antMatchers("/level-1.html").hasRole("level1") .antMatchers("/level-2.html").hasRole("level2") .antMatchers("/level-3.html").hasAuthority("level3"); //开启登录,无权限时进入登录页面 http.formLogin(); //记住我 http.rememberMe(); }
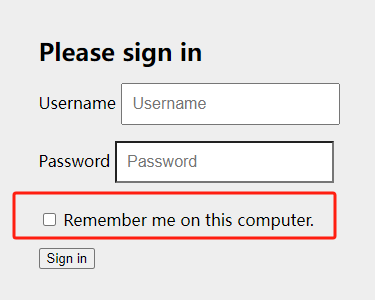
启动服务,访问页面,登录页面增加了记住我选择框
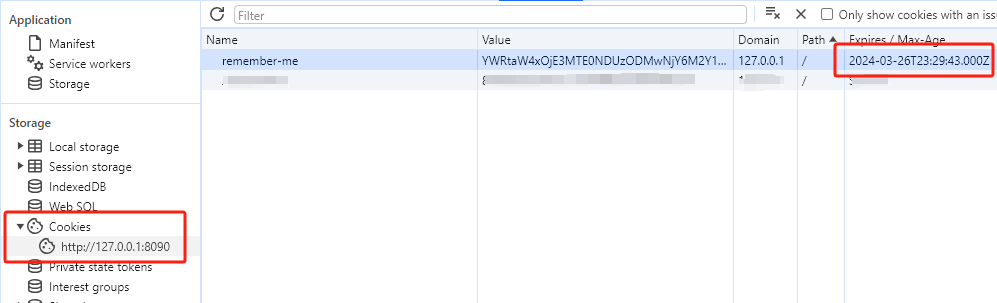
登录成功后,cookie中已保存用户信息,默认时间为2周
7 注销
7.1 配置类中开启注销
@Override protected void configure(HttpSecurity http) throws Exception { //请求授权的规则 //开启认证 http.authorizeRequests() //首页所有人可访问 .antMatchers("/").permitAll() //功能页对应角色或权限才能访问 //hasRole 为角色授权,表示用户拥有指定角色 //hasAuthority 为权限授权,表示用户拥有指定权限 .antMatchers("/level-1.html").hasRole("level1") .antMatchers("/level-2.html").hasRole("level2") .antMatchers("/level-3.html").hasAuthority("level3"); //开启登录,无权限时进入登录页面 http.formLogin(); //记住我 http.rememberMe(); //开启注销,注销成功后回首页 http.logout().logoutSuccessUrl("/"); }
7.2 level-* 页面增加注销按钮
<!DOCTYPE html><html lang="en"><head> <meta charset="UTF-8"> <title>Title</title></head><body><h1 style="color: red">这是用户等级1可访问的页面</h1><br><br><a href="/logout">注销</a></body></html>
其他两个页面做相同修改
启动服务,登录成功后点击注销按钮,注销成功,返回首页,访问页面需再次登录
8 自定义登录页
8.1 新建登录页login.html
<!DOCTYPE html><html lang="en"><head> <meta charset="UTF-8"> <title>Title</title> <meta charset="UTF-8"> <title>Login Page</title> <style> body { font-family: Arial, sans-serif; background-color: #f5f5f5; } .container { width: 300px; margin: auto; padding: 40px; border: 1px solid #ccc; background-color: white; box-shadow: 0 0 10px rgba(0, 0, 0, 0.1); } h2 { text-align: center; } label { display: block; margin-bottom: 10px; } input[type="text"], input[type="password"] { width: 100%; padding: 6px; border: 1px solid #ccc; outline: none; } button { width: 100%; padding: 10px; color: white; background-color: #4CAF50; cursor: pointer; border: none; outline: none; } button:hover { opacity: 0.9; } </style></head><body><div class="container"> <h2>登录</h2> <form action="/login" method="post"> <label for="username">用户名</label> <input type="text" id="username" name="username"><br><br> <label for="password">密码</label> <input type="password" id="password" name="password"><br><br> <input type="checkbox" name="remember-me" title="记住我">记住我<br><br> <button type="submit">登 录</button> </form></div></body></html>
8.2 配置类中开启自定义登录页
@Override protected void configure(HttpSecurity http) throws Exception { //请求授权的规则 //开启认证 http.authorizeRequests() //首页所有人可访问 .antMatchers("/").permitAll() //功能页对应角色或权限才能访问 //hasRole 为角色授权,表示用户拥有指定角色 //hasAuthority 为权限授权,表示用户拥有指定权限 .antMatchers("/level-1.html").hasRole("level1") .antMatchers("/level-2.html").hasRole("level2") .antMatchers("/level-3.html").hasAuthority("level3"); //开启登录,无权限时进入登录页面 //自定义登录页 http.formLogin().loginPage("/login.html").loginProcessingUrl("/login"); //关闭csrf防护 http.csrf().disable(); //记住我 http.rememberMe(); //开启注销,注销成功后回首页 http.logout().logoutSuccessUrl("/"); }
这里,自定义登录,默认用户参数是username,默认密码参数是password,默认记住我参数是remember-me,如果需要自定义登录表单的参数,做如下修改
//开启登录,无权限时进入登录页面 http.formLogin().loginPage("/login.html").loginProcessingUrl("/login") .usernameParameter("username") .passwordParameter("password"); //关闭csrf防护 http.csrf().disable(); //记住我 http.rememberMe().rememberMeParameter("remember-me");
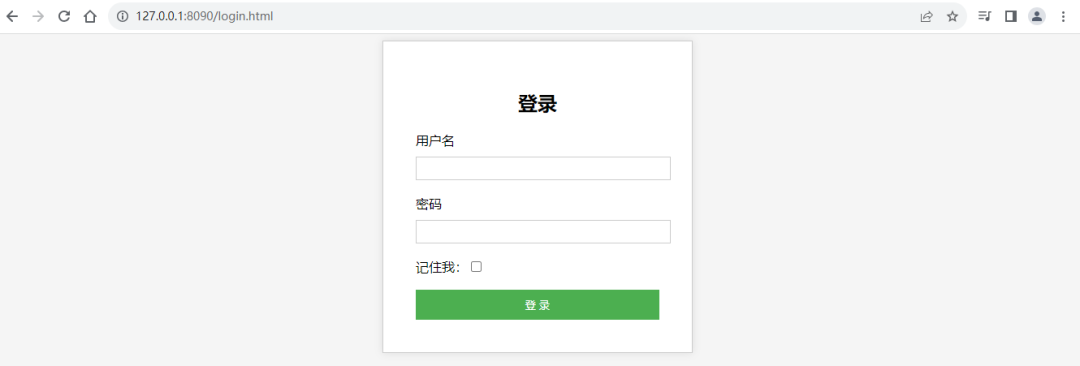
启动服务,访问地址,跳转到自定义登录页
9 自定义403页面
9.1 新建403.html
<!DOCTYPE html><html lang="en"><head> <meta charset="UTF-8"> <title>Title</title></head><body>权限不足,无法访问</body></html>
9.2 配置类中开启自定义403页面
@Override protected void configure(HttpSecurity http) throws Exception { //...其他代码... //自定义403页面 http.exceptionHandling().accessDeniedPage("/403.html"); }
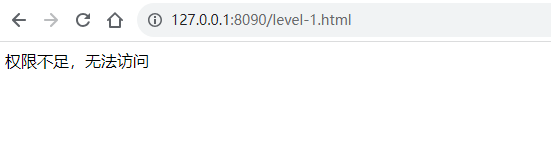
启动服务,浏览器访问,登录无权限用户后提示
至此,Spring Boot整合Spring Security实现用户认证和授权基本用法已讲解完毕,且测试通过。
CSDN:https://blog.csdn.net/dkbnull/article/details/136920791
知乎:https://zhuanlan.zhihu.com/p/688341417
本篇文章来源于微信公众号: 程序员null
微信扫描下方的二维码阅读本文

Comments NOTHING