1.介绍
netty-websocket-spring-boot-starter是一个开源的框架,通过它,可以像使用spring-boot-starter-websocket一样使用注解进行开发,只需要关注事件(onMessage)。并且底层是使用netty,当需要调参的时候,只需要修改配置参数即可,无需过多的关心handler的设置。
2.项目实战
2.1添加依赖
<dependency>
<groupId>org.springframework.boot</groupId>
<artifactId>spring-boot-starter-web</artifactId>
</dependency>

<dependency>
<groupId>org.projectlombok</groupId>
<artifactId>lombok</artifactId>
<optional>true</optional>
</dependency>
<dependency>
<groupId>org.yeauty</groupId>
<artifactId>netty-websocket-spring-boot-starter</artifactId>
<version>0.11.0</version>
</dependency>
2.2 创建核心类MyWebSocket
import io.netty.handler.codec.http.HttpHeaders;
import io.netty.handler.timeout.IdleStateEvent;
import org.springframework.util.MultiValueMap;
import org.yeauty.annotation.*;
import org.yeauty.pojo.Session;

import java.io.IOException;
import java.util.Map;

@ServerEndpoint(path = "/myWs",host = "${ws.host}",port = "${ws.port}")
//@Component
public class MyWebSocket {


   @OnOpen
   public void onOpen(Session session, HttpHeaders headers, @RequestParam String req, @RequestParam MultiValueMap reqMap, @PathVariable String arg, @PathVariable Map pathMap){
       System.out.println("new connection");
  }

   @OnClose
   public void onClose(Session session) throws IOException {
       System.out.println("one connection closed");
  }

   @OnError
   public void onError(Session session, Throwable throwable) {
       throwable.printStackTrace();
  }

   @OnMessage
   public void onMessage(Session session, String message) {
       System.out.println("接收的消息为:" + message);
       session.sendText("Hello Netty!");
  }

   @OnBinary
   public void onBinary(Session session, byte[] bytes) {
       for (byte b : bytes) {
           System.out.println(b);
      }
       session.sendBinary(bytes);
  }

   @OnEvent
   public void onEvent(Session session, Object evt) {
       if (evt instanceof IdleStateEvent) {
           IdleStateEvent idleStateEvent = (IdleStateEvent) evt;
           switch (idleStateEvent.state()) {
               case READER_IDLE:
                   System.out.println("read idle");
                   break;
               case WRITER_IDLE:
                   System.out.println("write idle");
                   break;
               case ALL_IDLE:
                   System.out.println("all idle");
                   break;
               default:
                   break;
          }
      }
  }
}
@ServerEndpoint注解
当ServerEndpointExporter类通过Spring配置进行声明并使用,它将会去扫描带有@ServerEndpoint的类,被注解的类将被注册为一个WebSocket端点,所有的配置项都在这个注解的属性中。
application.properties配置
server.port=8080

#ws相关属性配置
ws.host=0.0.0.0
ws.port=8333
# 解决返回页面中文乱码问题
server.servlet.encoding.force=true
server.servlet.encoding.charset=UTF-8
2.3 测试页面index.html
<!DOCTYPE HTML>
<html>
<head>
   <title>My WebSocket</title>
</head>

<body>
<input id="text" type="text" />
<button onclick="send()">Send</button>
<button onclick="closeWebSocket()">Close</button>
<div id="message"></div>


</body>

<script type="text/javascript">

   let ws = null;
   //判断当前浏览器是否支持WebSocket
   if ('WebSocket' in window) {
       ws = new WebSocket("ws://localhost:8333/myWs");
  }
   else {
       alert('当前浏览器 Not support websocket')
  }

   //连接发生错误的回调方法
   ws.onerror = function () {
       setMessageInnerHTML("WebSocket连接发生错误");
  };

   //连接成功建立的回调方法
   ws.onopen = function(event) {
       console.log("ws调用连接成功回调方法")
       //ws.send("")
  }
   //接收到消息的回调方法
   ws.onmessage = function(message) {
       console.log("接收消息:" + message.data);
       if (typeof(message.data) == 'string') {
           setMessageInnerHTML(message.data);
      }
  }
   //ws连接断开的回调方法
   ws.onclose = function(e) {
       console.log("ws连接断开")
       //console.log(e)
       setMessageInnerHTML("ws close");
  }

   //将消息显示在网页上
   function setMessageInnerHTML(innerHTML) {
       console.log(innerHTML)
       document.getElementById('message').innerHTML += '接收的消息:' + innerHTML + '<br/>';
  }

   //关闭连接
   function closeWebSocket() {
       ws.close();
  }


   //发送消息
   function send(msg) {
       if(!msg){
           msg = document.getElementById('text').value;
           document.getElementById('message').innerHTML += "发送的消息:" + msg + '<br/>';
           ws.send(msg);
      }
  }
</script>
</html>
2.4 测试
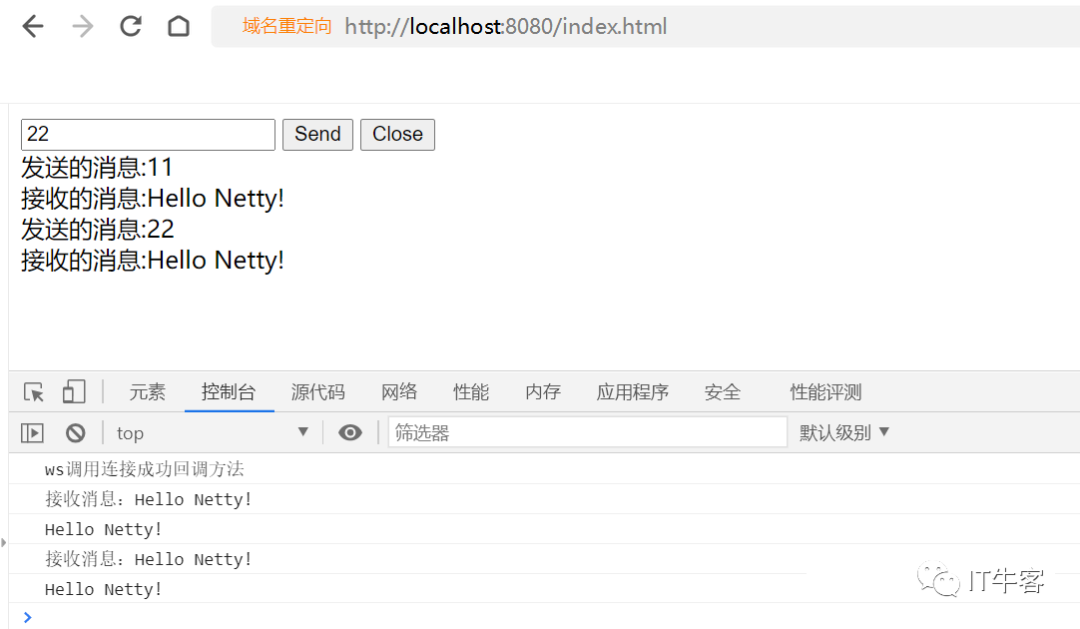
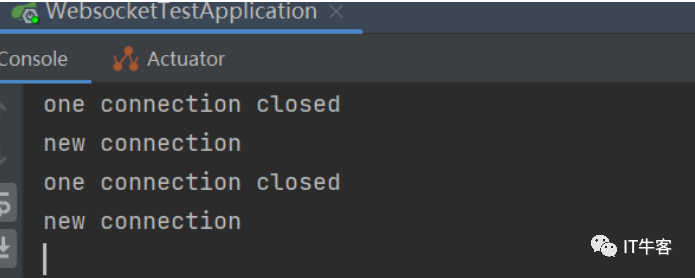
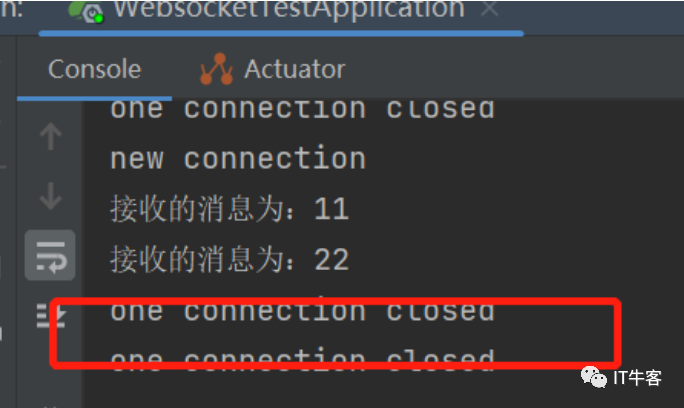
当打开浏览器时http://localhost:8080/index.html,建立一次新的连接。

当刷新浏览器时,则关闭原来的连接,重新建立一次连接。
当浏览器关闭时,后台onClose收到关闭消息。
如喜欢本文,请点击右上角,把文章分享到朋友圈
因公众号更改推送规则,请点“在看”并加“星标”第一时间获取精彩技术分享
·END·
本篇文章来源于微信公众号: IT牛客
微信扫描下方的二维码阅读本文

Comments NOTHING